Monday, October 8, 2012

Apple Slice

Now here is a conundrum… I want to keep writing this blog but I’ve been trying to cut out sugar as well as pasta, bread, rice, etc. This is problematic as grandma’s recipes can be pretty much divided into two categories: yummy desserts and carb-laden casseroles.


I decided today to bake a dessert and then give it away. Whether to neighbours, family or workmates – I’m sure someone will take it off my hands.


I’m making the very first recipe in the ‘bars and squares’ cookbook which also happens to be labeled as ‘good’.


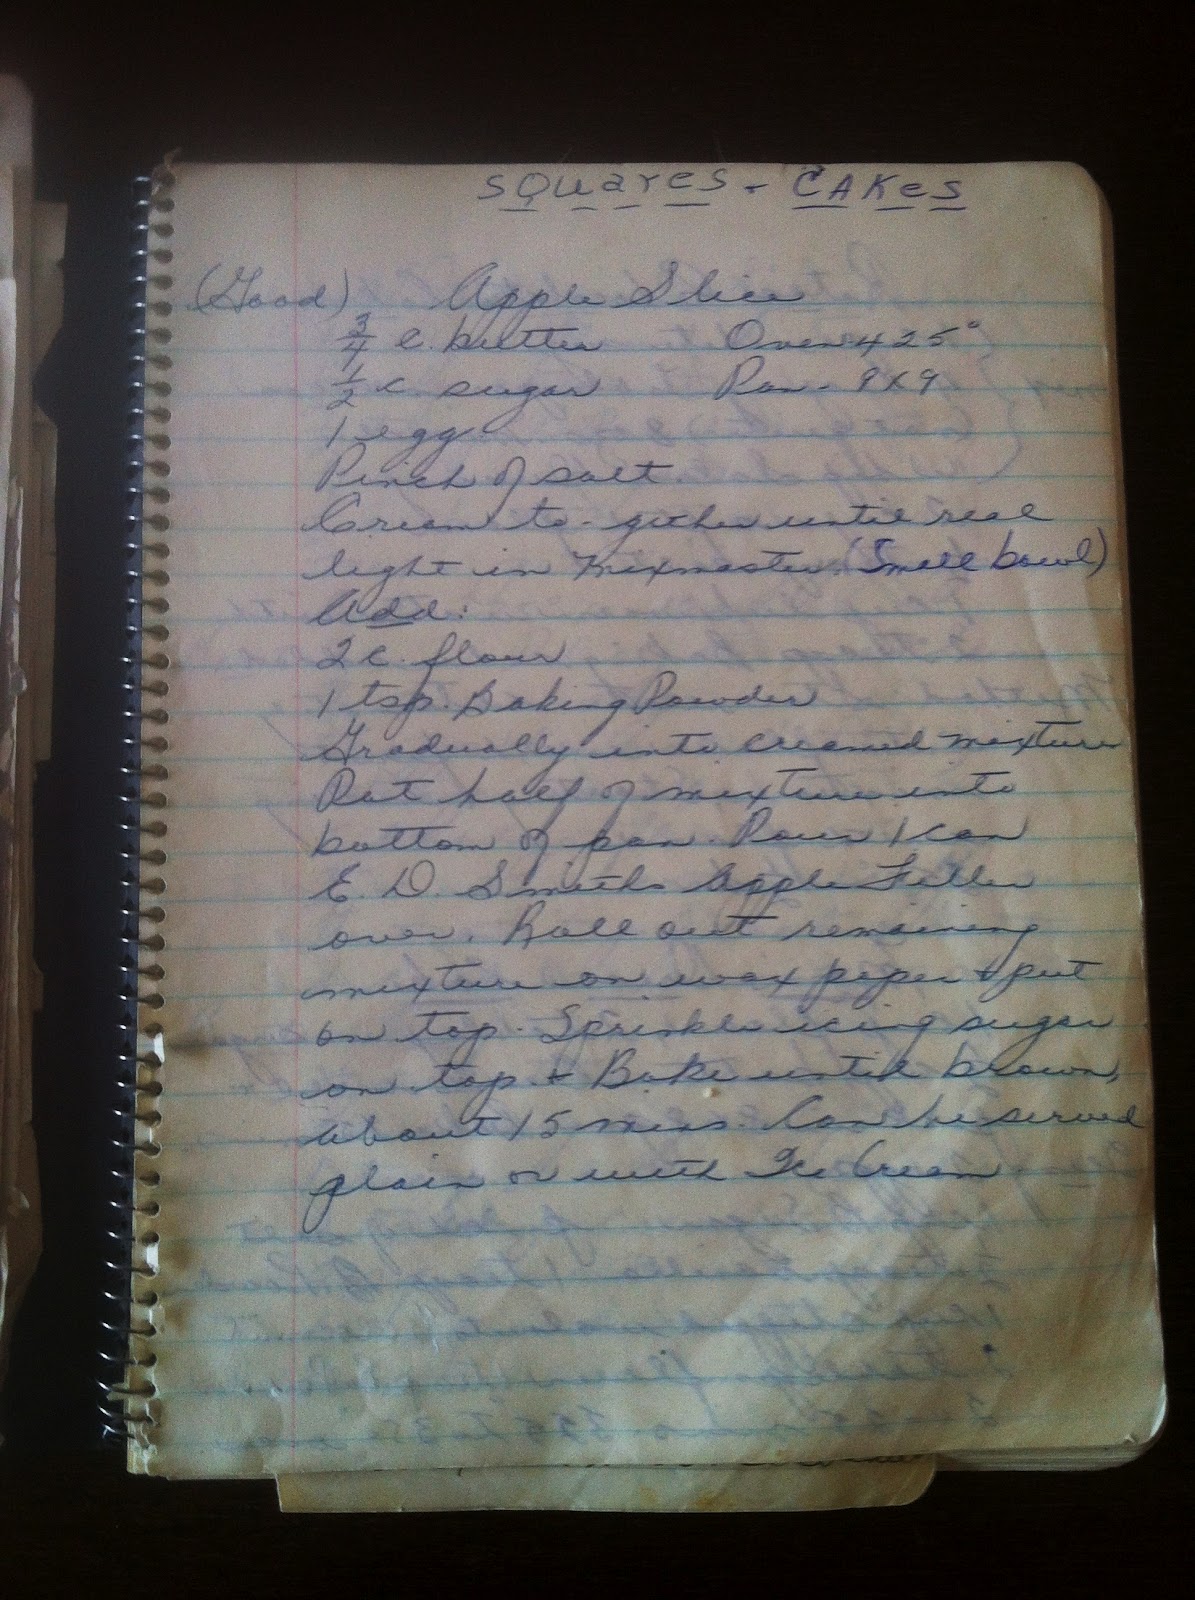
It looks super easy and looking through the only thing I need to pick up at the grocery store is some more butter (as I’m getting low) and a can of apple pie filling. 

When I was at the store I realized that a can of apple pie filling was about $4!!! Side note: I’m kinda cheap. I know I could just buy apples and make filling for less than this… but I want to follow the recipe exactly. 

Here are my ingredients. They look pretty non-scary as far as these recipes go. You can see that I cheaped out and went for the no-name brand of pie filling.


I grease up my pan (I’ve started to realize this is a key to success with these recipes). The only problem is that these are bars that are supposed to be made in a square pan but all of mine are at my sister’s place. I took them over when I was baking my niece’s castle shaped 3rd birthday cake (which was hi-lar-i-ous-ly bad by the way – you have to let go of perfectionism when you cake decorate with a 3-year-old). Ah well… pie plate it is.


It’s a pretty easy dough as I just throw butter, sugar and an egg in the mixer and give it a whirl (or ‘cream’ it if we are being fancy).


By the way can I tell you how much I love that the recipe tells you to mix it in your ‘mixmaster’! I should start calling my mixer that!

Slowly mix in the dry ingredients and voila – crust!


I squish a little less than half in to make the bottom crust.


Then I dump on the magic ingredient (shhhh... the secret ingredient is pie filling).


At this point I’m ready to roll out the top crust. The recipe says to do it on waxed paper but I don’t have that. I do however have a silicon mat and I figure that should work.


I know I should roll it but… well… my ex-husband got the rolling pin in the divorce. I’m not even kidding about that actually. I need to buy a new one but… did I mention I’m cheap and wine bottles do a pretty good job?


And now I just elegantly move this onto the top of the pan…


Oh crap. Well. Let’s call that rustic. Hey… I get to sprinkle icing sugar on top. That should cover all sins right.


Hmmm… not exactly the beautiful look I was planning but I’ll just keep soldiering ahead.


Into the oven it goes until it comes out browned and nummy smelling. I tried to take a slice out for a picture but it was just kind of falling apart. I could tell the bottom crust was pretty soggy and if I made it again I would probably blind bake that crust a bit first.


After this cooled I called my sister who happened to have her mother and father-in-law visiting from out of town. I asked if she wanted this dessert and she said they would probably really appreciate it – especially since she fed them brown rice and tofu for dinner!

I took the apple slice over and asked for their feedback for all of you folks. When I spoke with my sister a couple days later she said that the in-laws took their job very seriously. They said that it was a bit sweet for their tastes and that the bottom crust was a bit soggy (which I knew).


I did sneak a small spoonful and you know… it was very yummy for such a quick and easy dessert. Just maybe use the waxed paper!

Sunday, August 19, 2012

Butter Tart Squares


This recipe has all the hallmarks of a winner.  Grandma’s desserts are where she seems to shine and her cookies, bars and squares seem especially good.  Now consider that they are also based on butter tarts – the quintessential Canadian dessert… and well… I’m hoping for a winner.


This recipe is from one of the new handwritten cookbooks I recently received from my mom and dad. 
This book is nothing but bars and squares and like the last one is filled with both written recipes and clippings from papers and magazines.


I’ve chosen to make one of the recipes on a little handwritten square of paper tucked in the front of the book.


I apologize that these pictures are fuzzy.  I’m taking these pics on my iphone (hoping for a good real camera soon but that isn’t in the cards for now). 

The recipe is a very basic crust and then the filling is just mixed together and poured in.  It seems pretty straightforward.

Yes, very straightforward.  Here are my ingredients and… wait… dammit!  How do I not have oatmeal?  I thought I had about three bags of oatmeal!  Really?  None?  Not in any cupboards?


Sigh.


I guess for me oatmeal is the opposite of pickles.  I thought I had a lot of oatmeal when I was shopping earlier so I didn’t buy any.  Whenever I’m at the store and see pickles I think I need them and I have about four jars in my fridge.

But hey… look at all this Campbell’s Cream of Mushroom soup for sale!  I should stock up for the casseroles!


Back at home.  With ALL the ingredients.  I’ve never been a big fan of butter tarts because I don’t like raisins cooked into baked goods.  So for my buttertart squares I’m using only chopped walnuts.

The crust is just ½ cup butter (I subbed butter for the margarine in the recipe) mixed with a cup of flour and two tbsp. of brown sugar.  The crust isn’t as sweet as I expected it would be.


I pressed it into my well greased pan and baked it for 15 minutes at 350 degrees.

It came out just a little darker.


In the meantime I had mixed together the eggs, baking powder, brown sugar, salt, vanilla, oatmeal and chopped walnuts.  Look at how ooey and good that looks.


It just pours into the pan.  Then it is popped in the oven for 20 more minutes. 


While that cooks let me give you a little reason why butter tarts make Canadians so happy.  This is from the Wikipedia entry for butter tarts: “A butter tart is a type of small pastry tart highly regarded in Canadian cuisine and considered one of Canada's quintessential desserts. The tart consists of butter, sugar, syrup, and egg filled into a flaky pastry and baked until the filling is semi-solid with a crunchy top” and, “butter tarts were common in pioneer Canadian cooking, and they remain a characteristic pastry of Canada, considered one of only a few recipes of genuinely Canadian origin.”

So hum O Canada to yourself while eating butter tarts. 

When it comes out it is so tempting to try to cut it right away but it really does need to cool.  The filling is pretty soft when cooled so it is really runny when warm.


Here they are when cut into squares.


Take a clooooose look.  My god.  These are extremely addictive!  They are very sweet and rich but sooooo good.  I am now a butter tart convert thanks to Grandma G.  I am a convert for these squares. They are so easy and so good!  I highly recommend making a batch and feeling like a proud Canadian.


Sunday, July 15, 2012

Canadian-Style Goulash

Let me start by saying that I would really appreciate it if you could help me figure out why this dish is ‘Canadian-Style’. Being a Canadian… well I don’t see any cheese curds and gravy… or peameal bacon (or as American’s call it ‘Canadian bacon’).

This recipe is from a new cookbook. When I last visited home my mom gave me the rest of my Grandma G’s handwritten cookbooks as well as three printed cookbooks that were hers. All three printed books are collections of recipes and this is the one I am cooking from today.


As you can see this book is a collection of recipes for casseroles from the ladies of Beta Sigma Phi (oooh… are these secret sorority recipes?). Just look at the inspirational cover casserole! Those are surely canned mushrooms. I also learned the secret ingredient in the cover recipe is a can of Chef Boy-ar-dee Ravioli.

You may not be able to see that the cover boasts 1,000 casserole recipes. I can tell you that if they edited out all the ones that contained some kind of canned soup – the number would probably drop to about 150.


I decided to make the ‘Canadian-Style Goulash’. I chose this recipe for the following reasons: 1) Grandma had put a check next to it so I gather she made it at some point; 2) there was no canned soup in it; 3) I’m attempting to eat less meat and I can sub the ground beef for tvp; and 4) I need cheap lunches for the week and this would seem to do the trick.


The assembled ingredients are pretty straightforward. The recipe calls for margarine but I have chosen to use butter instead. I’m also using that bag of tvp (textured vegetable protein) instead of ground beef and I’m going to use some fresh garlic instead of the optional pinch of garlic salt.


As I have everything cooking up you can see my biggest casserole dish in the background, then my pot of boiling water for the pasta and then the tvp cooking with the chopped veggies and grated cheese in the foreground.


The most interesting thing about the recipe for you, the reader, may be the prep of the tvp. I decided to use the recipe here.


I doubled the recipe and in the picture above it is simmering with water and three tbsp. of soy sauce. After all the water was absorbed I put in some olive oil, a splash of worcestershire sauce, a few drops of liquid smoke and some oregano and cumin. I think it looks pretty close to ground beef in the end and had a nice flavour. Also this amount of tvp cost about $0.60 at my bulk store.

When the pasta was done I mixed it with half the grated sharp cheddar cheese.


I then added the tvp mixture, a can of crushed tomatoes, and I can of tomato paste. I also added the chopped onion, green pepper and garlic that I had sautéed for five minutes in some butter and olive oil. The recipe called for a half cup each of the green pepper and onion but I just used the whole pepper and whole onion as well as three cloves of garlic.


Here it is with the cheese sprinkled on top ready for the oven for… what the hell! TWO HOURS!


Everything in this is cooked already… why does it need to...? Oh okay. Two hours. I guess the ‘flavours merge’ during that time or something. It’s a good thing I started this a long time before dinner!

While this cooks I’m curious why this is called a goulash. What is a goulash?

Let’s compare what I’m making to the Wikipedia definition: Goulash (Hungarian: gulyás) is a soup or stew [not really] of meat [okay], noodles [yes] and vegetables [a few] (especially potato [nope]), seasoned with paprika [definitely not] and other spices [garlic salt?].
So we seem to have a loose interpretation of a ‘goulash’ and I still don’t know what makes it ‘Canadian-style’.

Well it did smell good while cooking. I should mention that I added pepper but with all the soy sauce I put in the tvp I didn’t add any other salt to the dish.

Coming out of the oven… it looks like it could feed a crowd.


This is a dish that is hard to make look pretty!


You know what? It tasted pretty good. It tasted exactly as you might expect. Kind of like lasagna made with more of a pizza sauce (probably because of the tomato paste). I enjoyed it and I think it will do well for lunches for work. It was also very inexpensive to make. My favourite part about this recipe was learning how to use the tvp. With all the ground beef recipes that I have in these cookbooks I think I just found a way to make them a touch healthier.


Wednesday, July 4, 2012

Thimble Cookies

I decided today to try a classic looking jam-filled cookie that seemed like it would be pretty tasty and easy to make.

It was once again from one of the clipped recipes in the book and you can see this was submitted by Jean Soluk from Beausejour. I also find the other recipes kind of amusing – like the ‘oriental’ chicken 'plaff' (pilaf?) and the sweet and sour sauce that they make sure to point out is Chinese. Ah small town life in the 70s.


Let me also show you my favourite thing about this recipe – the back. Check out how much house you can get in Thunder Bay for $26,900 at that time! Also I like the little bit at the bottom about someone looking for a player piano.


So let’s get started on the cookies. Here are the ingredients. All nice normal baking ingredients… no gelatine in this one! In any form!


I start with creaming the butter and sugar. I love the pale colour of creamed butter. Then I add the egg yolks and it is such a beautiful bright yellow colour.


Adding the dry ingredients the dough comes together – super simple.


I use the nuts that I have on hand which are walnuts. They are left over from some apple walnut muffins. I decided to break them down in my Magic Bullet blender (which I love – great for small blending and for smoothies!). I almost went too far and made walnut butter – but I stopped just in time.


So I’ve got my assembly line set up. Once again, please feel free to note the horridness of my kitchen. Although it does put me in the ‘cooking from the 70’s’ frame of mind. And I’m kind of becoming fond of the ugliness of it. So I’m rolling into balls, dipping in egg white, rolling in nuts then making a dip in the middle with a wooden spoon.


Here they are all set for the oven. This was when I noticed it didn’t actually say how long to bake them for. You would never see that in a published recipe now – but I guess you just knew to bake them until they were golden – which I did.


When they came out I spooned some jam in each one and here are the finished cookies.


They were good. It’s a good thing they have jam in them because the cookie itself was pretty crumbly and dry but the jam made it moist and sweet. I’m planning on making my dad (a person notoriously hard to shop for) a basket of homemade goodies for as a present and I think I’ll include some of these.